Monday, April 18, 2016

Maps in SharePoint Online

Maps are in virtually any app or portal we use on a day-to-day basis. SQL server consumers have utilized this feature since the 2008 version of the database product, exposing the data via various custom interfaces. Maps have finally been integrated in SharePoint’s 2013 online and on-premises versions, and it is relatively easy (and code-free!) to collect or view geographical information.

Microsoft introduces a new type of list field named “geography” which allows you to add a longitude and latitude to your records. Lists that capture office information, delivery locations or even employee directories for multi-state or global companies can have this type of field added. Once the information is in, a simple Bing map view will allow users to look at geographical representations of their data.

However, currently, this feature is hidden in both Office 365 and SharePoint 2013.
For on-premises installations, your admin needs to run an executable available on the Microsoft site (SQLSysClrTypes.msi).

For Office 365, there are a couple of steps you need to execute to enjoy this exciting new feature:


  1. Register with Bing maps to get a key for your map views
  2. Add a new field of type, “geography” to the list
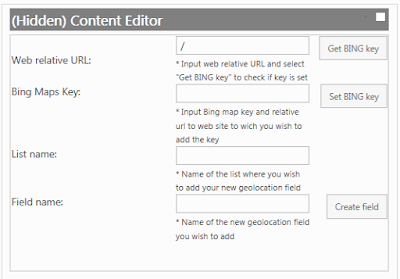
  3. Since this type is hidden, you can use PowerShell or JavaScript to create it (Reference this script)
    The script creates a friendly input form that you can even leave hidden on the page for future use
  4. Make sure you specify the Bing maps key in the textbox
  5. Create a new view of type, “Map view”

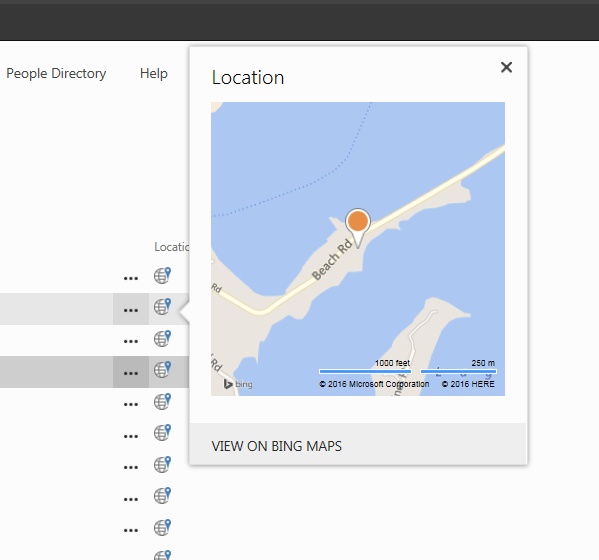
If you have performed the steps above successfully, you should be able to see a full map with all locations on it, like on the screenshot below!

Friday, March 25, 2016

Utilizing browser profiles in Office 365 to make things easier

“Let me show you what that looks like on our 365 tenant!”  Many of us in consulting, whether sales, client managers or developers have said these words in the past years when talking to various clients.

There is infinite power behind being able to immediately show a business stakeholder what something would, “look like.” As interest in Office 365 has become viral, so has the number of accounts and tenant URL’s we need to be able to manage. Typing in credentials every single time we switch from one tenant to another simply isn’t scalable in our line of work.

Confronted with over four different client test tenants as well as our own internal one, I decided to make things easier and looked into browser profiles. As it turns out, Chrome happens to allow you to create several user profiles on the same work laptop. These profiles store cookies and other settings for you so you can easily launch several browser instances in parallel, each under a different profile.

I am now able to quickly switch from debugging something for a client to demo-ing an app I have on my own tenant. I can do this without logging out and back in or the browser getting confused about my credentials. I now have a browser shortcut on my desktop for each one of our clients – and these shortcuts allow me to directly navigate to each specific tenant and automatically log in.

How to set this up:

Open up Chrome and go to Settings. In the, “People,” section add a new person. For example, this is how I added, “My Awesome Client:”

Click the desktop shortcut and you can proceed to log and, “keep me logged in,” on the Microsoft login page. In the browser settings, make sure you set your target tenant as the home page.

Now, going forward, every time you will use this shortcut, not only will you be able to quickly identify via icons which browser windows you already have in use, but you will also completely remove the consecutive log outs and ins.


Google Chrome is my best bet for this functionality. Firefox offers it as well, but takes a bit more effort to configure. For now, IE only allows for, “new session,” tabs – a subset of this functionality.

The only downside to this approach is that other tools such as Visual Studio or SharePoint Designer still work in conjunction with IE and expect you to be logged in there. But for the majority of our work, this is tremendous help!  

Wednesday, September 9, 2015

Things to watch on SharePoint migrations

I've recently worked on a larger migration project from SharePoint 2007 to 2013/Office 365.

One of the goals of the initial phase of the project was to establish whether or not the sites could entirely migrate to Office 365 or if an on-premise installation would be required, in conjunction with Office 365. Naturally, the on-premise installation would imply a hybrid scenario and the whole infrastructure overhead that would come with it.

There are an array of tools out there that can collect the majority of information you need on your content: DocAve from AvePoint, Metalogix or ShareGate reports.
These tools can go as deep as report on

  • All features installed by site url
  • Size of sites (GB) 
  • The last time a site has been used
  • Site templates
  • Custom list templates
  • Custom webparts, etc. 
In reality, there is not much need for scripting anything in order to find out exactly what your farm(s) contains and how it is used.

The same names offer migration tools (e.g. Content Matrix) that allow for a very configurable migration at any level (web app, site collection or list level even).

The real challenge are customizations and their portability to SharePoint 2013 or Office 365.
When it comes to customizations, one needs to quickly be able to differentiate between customizations that can be replaced with new SharePoint/365 functionality and customizations that will require more digging around and possible conversations with business users.

Things to watch for that can be easily overlooked:

  • remember un-ghosted forms/pages : not many tools report on this, but you can write a short PS script that will give you the list of those in a farm
  • InfoPath forms - can be migrated nicely, but they have data connections that need to be updated (also via script if necessary)
  • workflows
Possible approaches:
  • work at site collection level OR if you need to go down to site level, make sure you work within the hierarchy of sites! Labeling a particular sub-site without customizations as "migration-ready" may be incorrect if the parent site collection has custom features.
  • Use a data analysis tool like PowerPivot to aggregate all reports. This will be more about making sense of numerous reports, rather than developing the reports. Remember there's tools out there that do this for you!
  1. PowerPivot is a great tool that allows you to aggregate various reports (similarly to a database with relationships and joins)
  2. PowerPivot will allow you to expand/collapse on a hierarchy of sites within site collections
  3. PowerPivot will allow you to slice and dice by custom wsp-s, features, site collection admin, etc.
  4. PowerPivot will make the new IA become evident to you, especially in the case of huge numbers of sites.
  5. And last, but not least, it will give you the final list of sites and their attributes in a CSV/Excel format, so you can take that and "feed" it to any migration tool in an automated manner.
As a result of the slicing and dicing, you will be able to show value to the business users and avoid a hybrid approach.

Have fun migrating!!


Tuesday, August 26, 2014

SharePoint 2010 Enterprise Search Grouping

In the previous post, we discussed sorting the search results of the core search results web part by our custom search properties. This can be achieved by extending the core search results web part and overwriting the ConfigureDataSourceProperties() method.
It is also possible to group the results by a property or even a combination of properties.

For example, if I have 2 managed properties called 'MyDepartment' and 'MyReportType' and I would like to see the results grouped by all possible combinations of these two properties, such as:


Asset Management - Account Activity  -

  • Account Activity for Account A and Quarter 1
  • Account Activity for Account B Q4

Asset Management - Asset Acquisitions -

  • Asset Acquisitions 2014
  • Asset Acquisitions Feb 2014

Asset Management - Quarterly Income Reports +
Compliance - Quarterly Compliance Report  +
Investment Management - Risk Analysis +
Investment Management - Risk Decomposition +


, each one with a suite of reports within each group, where inside each grouping the reports would be sorted by other managed properties, such as a specific date property for example.
The group by criteria is bolded out and on expand (+) it would show all results for the group.

As a first step, the group-by properties need to be added to the sort-by collection, in their order of relevance. Note the MyDepartment is the first sort criteria, alphabetically ascending, followed by 'MyReportType':

                   // get the datasource and change the sort order
                    CoreResultsDatasource dataSource = this.DataSource as CoreResultsDatasource;
                    if (sortBy != string.Empty)
                    {
                        dataSource.SortOrder.Clear();
                        dataSource.SortOrder.Add("mydepartment", sd);
                        dataSource.SortOrder.Add("myreporttype", sd);


                    }

In the XSLT we will generate the presentation of the group, by applying the Muenchian method, found on Jeni Tennison's site:

  1. First we declare a key in the declaration area of the XSLT:
    <xsl:key name="gg" match="/All_Results/Result" use="concat(mydepartment, myreporttype)"/>
  2. We modify the regular body template to perform two for-eaches, one for the group-by criteria and another one for the results within each group-by value:

<xsl:template name="dvt_1.body">
    <xsl:for-each select="/All_Results/Result[count(. | key('gg', concat(mydepartment,myreporttype))[1]) = 1]">
      <tr>
        <td colspan="8">
           <xsl:value-of select="
mydepartment"/>
          <xsl:text> - </xsl:text>
          <xsl:value-of select="
myreporttype"/>
          <xsl:text> + </xsl:text> <!-- additional html and javascript to achieve expand-collapse-->
        </td>
      </tr>
      <xsl:for-each select="key('gg', concat(
mydepartment,myreporttype))">
        <xsl:sort select="myeffectivedate" order="descending"/>
        <xsl:call-template name="dvt_1.rowview"/>
      </xsl:for-each>
    </xsl:for-each>
  </xsl:template>


3. Inside the inner for-each, specify the sort criteria to be the date column. The results are rendered by calling the dvt_1.rowview template.


Tuesday, July 29, 2014

SharePoint 2010 Enterprise Search Custom Sort

When you want to sort your search by something more than just Modified date or Relevance, such as your own custom managed properties, a way to achieve this in SharePoint 2010 would be by extending the Core Search Results Web Part like below.
The Core Search Results Web Part can give a page size for up to 50 items, but you may also be able to overwrite that via the extension.

The webpart now reads the sort criteria and direction from the query-string, as well as an extra parameter that allows the user to specify whether the results should be paged at all or displayed in a single page. If they are paged, rather than using the limit of 50, a custom web part property is being used, which is in this example set to a default of 100.


    [ToolboxItemAttribute(false)]
    public class ExtendedSearchResultsWebPart : CoreResultsWebPart
    {
        int customResultsPerPage = 100;
        [Personalizable(PersonalizationScope.Shared)]
        [WebBrowsable(true)]
        [WebDescription("Results per page")]
        [WebDisplayName("Results per page")]
        [Category("Custom")]
        public int CustomResultsPerPage { get{ return customResultsPerPage;} set { value = customResultsPerPage;} }

        protected override void ConfigureDataSourceProperties()
        {
            if (this.ShowSearchResults)
            {
                base.ConfigureDataSourceProperties();
                try
                {
                    bool viewAll = false;
                    string sortBy = string.Empty;
                    Microsoft.Office.Server.Search.Query.SortDirection sd = Microsoft.Office.Server.Search.Query.SortDirection.Descending;
                    if (this.Page.Request.QueryString["pall"] != null)
                    {
                        if (this.Page.Request.QueryString["pall"] == "1")
                            viewAll = true;
                    }
                    if (this.Page.Request.QueryString["sort"] != null)
                    {
                        sortBy = this.Page.Request.QueryString["sort"];
                        if(this.Page.Request.QueryString["sd"] != null)
                        {
                            sd = this.Page.Request.QueryString["sd"] == "ascending" ? Microsoft.Office.Server.Search.Query.SortDirection.Ascending : Microsoft.Office.Server.Search.Query.SortDirection.Descending;
                        }
                    }
                    else sortBy = "MYCUSTOMDEFAULTPROPERY";

                        // get the datasource and change the sortorder
                        CoreResultsDatasource dataSource = this.DataSource as CoreResultsDatasource;
                        dataSource.ResultsPerPage = (viewAll == false ? CustomResultsPerPage : 5000);
                        if (sortBy != string.Empty)
                        {
                            dataSource.SortOrder.Clear();
                            dataSource.SortOrder.Add(sortBy, sd);
                        }

                 }
                catch (Exception ex)
                {
                     ULSLogging.LogError("MYLOGGING", "Search: " + ex.Message, ex.StackTrace); }
       
                }
            }

        }

Tuesday, February 18, 2014

Custom Actions for list items assigned programmatically


Custom actions are usually deployed in a declarative manner, such as an Elements.xml file. They can be deployed to a specific content type in case your document library inherits from the specific content type, such as below:

<?xml version="1.0" encoding="utf-8"?>
<Elements xmlns="http://schemas.microsoft.com/sharepoint/">
  </CustomAction>
  <CustomAction
  Id="{ACE9ADB4-A9CE-4503-9819-AC9C6FC09E01}"
  RegistrationType="ContentType"
  RegistrationId="0x01010059dee241fa9e47e8aded6c595cb2b406"
  Location="EditControlBlock"
  Sequence="101"
  Title="Approve/Reject Monthly Report">
    <UrlAction Url="javascript:MyNamespace.retrieveListItems({ItemId});"/>
  </CustomAction>
  
</Elements>
       
However, when your document library gets deployed via code, such as  feature receiver, and especially if the document library is not associated with a content type, there is the option to attach a custom action programmatically such as  in the example below.           


                    Guid formlibID = web.Lists.Add("My Library", string.Empty, SPListTemplateType.XMLForm);
                    SPList formLib = web.Lists[formlibID];

                    SPUserCustomAction printForm = formLib.UserCustomActions.Add();
                    printForm.Title = "Print Form";
                    printForm.Url = "javascript:MyNamespace.printForm({ItemId},'{ItemUrl}')";
                    printForm.Location = "EditControlBlock";
                    printForm.Update();

In both examples, the custom action performs some javascript logic (in this case the two functions both open up a modal popup), that takes in the current items' out-of-the-box ID and URL. 

Thursday, May 9, 2013

Double AD profiles in User Profile Service?

This is directly related to working with Claims.

The user profile service imports AD accounts and sets the 'identifier' of the object to be the sAMAAccountName (This is the AD property which looks like sampledomain\johndoe).

When a claims web app accesses the User Profile service, such as for example MySites, if configured to use Claims, it looks for the User Profile service by it's own identifier, which is the token in a format like this:  i:0#.f|ldapmember|johndoe

The object will not be found, and MySites will generate the user profile and set the url to the personal site (yet another property in User Profiles), and this is how you end up with two records that refer to the same person, such as below:


The first one is the one generated by the User Profile Service, with properties such as First name, Last Name and other properties you have mapped to be imported from AD, while the other profile is the one generated by MySites, and only has the token and the URL set to the personal site.

The solution is to map the two identifiers to each-other so that when a claims-based app queries the User Profile service, it finds the profile by token.


The first property, Claim User Identifier, refers to the token and the mapped AD property called sAMAAccountName refers to the format domain\user.

Once mapped, any user profile action will follow this rule. For already existing duplicate accounts, the duplicate token one needs to be deleted for clean-up.

The new MySite generations should look like this:


This solution assumes that when you set up the UPS AD connection, you configure it as well as Claims: