Monday, April 18, 2016

Maps in SharePoint Online

Maps are in virtually any app or portal we use on a day-to-day basis. SQL server consumers have utilized this feature since the 2008 version of the database product, exposing the data via various custom interfaces. Maps have finally been integrated in SharePoint’s 2013 online and on-premises versions, and it is relatively easy (and code-free!) to collect or view geographical information.

Microsoft introduces a new type of list field named “geography” which allows you to add a longitude and latitude to your records. Lists that capture office information, delivery locations or even employee directories for multi-state or global companies can have this type of field added. Once the information is in, a simple Bing map view will allow users to look at geographical representations of their data.

However, currently, this feature is hidden in both Office 365 and SharePoint 2013.
For on-premises installations, your admin needs to run an executable available on the Microsoft site (SQLSysClrTypes.msi).

For Office 365, there are a couple of steps you need to execute to enjoy this exciting new feature:


  1. Register with Bing maps to get a key for your map views
  2. Add a new field of type, “geography” to the list
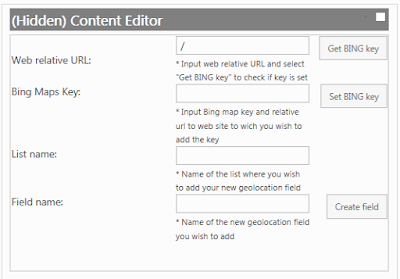
  3. Since this type is hidden, you can use PowerShell or JavaScript to create it (Reference this script)
    The script creates a friendly input form that you can even leave hidden on the page for future use
  4. Make sure you specify the Bing maps key in the textbox
  5. Create a new view of type, “Map view”

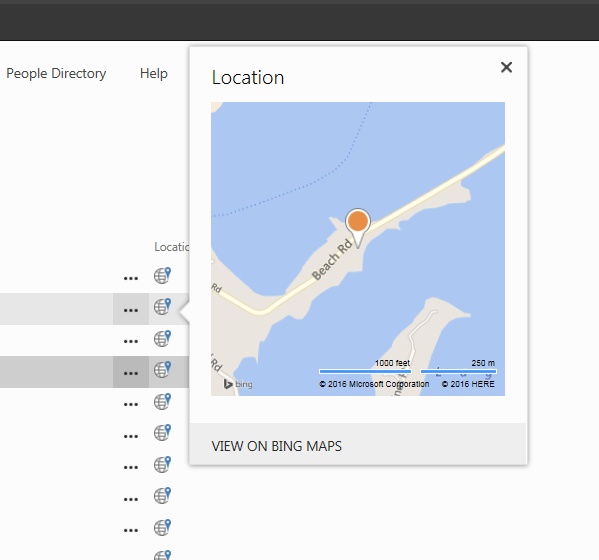
If you have performed the steps above successfully, you should be able to see a full map with all locations on it, like on the screenshot below!

Friday, March 25, 2016

Utilizing browser profiles in Office 365 to make things easier

“Let me show you what that looks like on our 365 tenant!”  Many of us in consulting, whether sales, client managers or developers have said these words in the past years when talking to various clients.

There is infinite power behind being able to immediately show a business stakeholder what something would, “look like.” As interest in Office 365 has become viral, so has the number of accounts and tenant URL’s we need to be able to manage. Typing in credentials every single time we switch from one tenant to another simply isn’t scalable in our line of work.

Confronted with over four different client test tenants as well as our own internal one, I decided to make things easier and looked into browser profiles. As it turns out, Chrome happens to allow you to create several user profiles on the same work laptop. These profiles store cookies and other settings for you so you can easily launch several browser instances in parallel, each under a different profile.

I am now able to quickly switch from debugging something for a client to demo-ing an app I have on my own tenant. I can do this without logging out and back in or the browser getting confused about my credentials. I now have a browser shortcut on my desktop for each one of our clients – and these shortcuts allow me to directly navigate to each specific tenant and automatically log in.

How to set this up:

Open up Chrome and go to Settings. In the, “People,” section add a new person. For example, this is how I added, “My Awesome Client:”

Click the desktop shortcut and you can proceed to log and, “keep me logged in,” on the Microsoft login page. In the browser settings, make sure you set your target tenant as the home page.

Now, going forward, every time you will use this shortcut, not only will you be able to quickly identify via icons which browser windows you already have in use, but you will also completely remove the consecutive log outs and ins.


Google Chrome is my best bet for this functionality. Firefox offers it as well, but takes a bit more effort to configure. For now, IE only allows for, “new session,” tabs – a subset of this functionality.

The only downside to this approach is that other tools such as Visual Studio or SharePoint Designer still work in conjunction with IE and expect you to be logged in there. But for the majority of our work, this is tremendous help!  

Wednesday, September 9, 2015

Things to watch on SharePoint migrations

I've recently worked on a larger migration project from SharePoint 2007 to 2013/Office 365.

One of the goals of the initial phase of the project was to establish whether or not the sites could entirely migrate to Office 365 or if an on-premise installation would be required, in conjunction with Office 365. Naturally, the on-premise installation would imply a hybrid scenario and the whole infrastructure overhead that would come with it.

There are an array of tools out there that can collect the majority of information you need on your content: DocAve from AvePoint, Metalogix or ShareGate reports.
These tools can go as deep as report on

  • All features installed by site url
  • Size of sites (GB) 
  • The last time a site has been used
  • Site templates
  • Custom list templates
  • Custom webparts, etc. 
In reality, there is not much need for scripting anything in order to find out exactly what your farm(s) contains and how it is used.

The same names offer migration tools (e.g. Content Matrix) that allow for a very configurable migration at any level (web app, site collection or list level even).

The real challenge are customizations and their portability to SharePoint 2013 or Office 365.
When it comes to customizations, one needs to quickly be able to differentiate between customizations that can be replaced with new SharePoint/365 functionality and customizations that will require more digging around and possible conversations with business users.

Things to watch for that can be easily overlooked:

  • remember un-ghosted forms/pages : not many tools report on this, but you can write a short PS script that will give you the list of those in a farm
  • InfoPath forms - can be migrated nicely, but they have data connections that need to be updated (also via script if necessary)
  • workflows
Possible approaches:
  • work at site collection level OR if you need to go down to site level, make sure you work within the hierarchy of sites! Labeling a particular sub-site without customizations as "migration-ready" may be incorrect if the parent site collection has custom features.
  • Use a data analysis tool like PowerPivot to aggregate all reports. This will be more about making sense of numerous reports, rather than developing the reports. Remember there's tools out there that do this for you!
  1. PowerPivot is a great tool that allows you to aggregate various reports (similarly to a database with relationships and joins)
  2. PowerPivot will allow you to expand/collapse on a hierarchy of sites within site collections
  3. PowerPivot will allow you to slice and dice by custom wsp-s, features, site collection admin, etc.
  4. PowerPivot will make the new IA become evident to you, especially in the case of huge numbers of sites.
  5. And last, but not least, it will give you the final list of sites and their attributes in a CSV/Excel format, so you can take that and "feed" it to any migration tool in an automated manner.
As a result of the slicing and dicing, you will be able to show value to the business users and avoid a hybrid approach.

Have fun migrating!!


Tuesday, August 26, 2014

SharePoint 2010 Enterprise Search Grouping

In the previous post, we discussed sorting the search results of the core search results web part by our custom search properties. This can be achieved by extending the core search results web part and overwriting the ConfigureDataSourceProperties() method.
It is also possible to group the results by a property or even a combination of properties.

For example, if I have 2 managed properties called 'MyDepartment' and 'MyReportType' and I would like to see the results grouped by all possible combinations of these two properties, such as:


Asset Management - Account Activity  -

  • Account Activity for Account A and Quarter 1
  • Account Activity for Account B Q4

Asset Management - Asset Acquisitions -

  • Asset Acquisitions 2014
  • Asset Acquisitions Feb 2014

Asset Management - Quarterly Income Reports +
Compliance - Quarterly Compliance Report  +
Investment Management - Risk Analysis +
Investment Management - Risk Decomposition +


, each one with a suite of reports within each group, where inside each grouping the reports would be sorted by other managed properties, such as a specific date property for example.
The group by criteria is bolded out and on expand (+) it would show all results for the group.

As a first step, the group-by properties need to be added to the sort-by collection, in their order of relevance. Note the MyDepartment is the first sort criteria, alphabetically ascending, followed by 'MyReportType':

                   // get the datasource and change the sort order
                    CoreResultsDatasource dataSource = this.DataSource as CoreResultsDatasource;
                    if (sortBy != string.Empty)
                    {
                        dataSource.SortOrder.Clear();
                        dataSource.SortOrder.Add("mydepartment", sd);
                        dataSource.SortOrder.Add("myreporttype", sd);


                    }

In the XSLT we will generate the presentation of the group, by applying the Muenchian method, found on Jeni Tennison's site:

  1. First we declare a key in the declaration area of the XSLT:
    <xsl:key name="gg" match="/All_Results/Result" use="concat(mydepartment, myreporttype)"/>
  2. We modify the regular body template to perform two for-eaches, one for the group-by criteria and another one for the results within each group-by value:

<xsl:template name="dvt_1.body">
    <xsl:for-each select="/All_Results/Result[count(. | key('gg', concat(mydepartment,myreporttype))[1]) = 1]">
      <tr>
        <td colspan="8">
           <xsl:value-of select="
mydepartment"/>
          <xsl:text> - </xsl:text>
          <xsl:value-of select="
myreporttype"/>
          <xsl:text> + </xsl:text> <!-- additional html and javascript to achieve expand-collapse-->
        </td>
      </tr>
      <xsl:for-each select="key('gg', concat(
mydepartment,myreporttype))">
        <xsl:sort select="myeffectivedate" order="descending"/>
        <xsl:call-template name="dvt_1.rowview"/>
      </xsl:for-each>
    </xsl:for-each>
  </xsl:template>


3. Inside the inner for-each, specify the sort criteria to be the date column. The results are rendered by calling the dvt_1.rowview template.


Tuesday, July 29, 2014

SharePoint 2010 Enterprise Search Custom Sort

When you want to sort your search by something more than just Modified date or Relevance, such as your own custom managed properties, a way to achieve this in SharePoint 2010 would be by extending the Core Search Results Web Part like below.
The Core Search Results Web Part can give a page size for up to 50 items, but you may also be able to overwrite that via the extension.

The webpart now reads the sort criteria and direction from the query-string, as well as an extra parameter that allows the user to specify whether the results should be paged at all or displayed in a single page. If they are paged, rather than using the limit of 50, a custom web part property is being used, which is in this example set to a default of 100.


    [ToolboxItemAttribute(false)]
    public class ExtendedSearchResultsWebPart : CoreResultsWebPart
    {
        int customResultsPerPage = 100;
        [Personalizable(PersonalizationScope.Shared)]
        [WebBrowsable(true)]
        [WebDescription("Results per page")]
        [WebDisplayName("Results per page")]
        [Category("Custom")]
        public int CustomResultsPerPage { get{ return customResultsPerPage;} set { value = customResultsPerPage;} }

        protected override void ConfigureDataSourceProperties()
        {
            if (this.ShowSearchResults)
            {
                base.ConfigureDataSourceProperties();
                try
                {
                    bool viewAll = false;
                    string sortBy = string.Empty;
                    Microsoft.Office.Server.Search.Query.SortDirection sd = Microsoft.Office.Server.Search.Query.SortDirection.Descending;
                    if (this.Page.Request.QueryString["pall"] != null)
                    {
                        if (this.Page.Request.QueryString["pall"] == "1")
                            viewAll = true;
                    }
                    if (this.Page.Request.QueryString["sort"] != null)
                    {
                        sortBy = this.Page.Request.QueryString["sort"];
                        if(this.Page.Request.QueryString["sd"] != null)
                        {
                            sd = this.Page.Request.QueryString["sd"] == "ascending" ? Microsoft.Office.Server.Search.Query.SortDirection.Ascending : Microsoft.Office.Server.Search.Query.SortDirection.Descending;
                        }
                    }
                    else sortBy = "MYCUSTOMDEFAULTPROPERY";

                        // get the datasource and change the sortorder
                        CoreResultsDatasource dataSource = this.DataSource as CoreResultsDatasource;
                        dataSource.ResultsPerPage = (viewAll == false ? CustomResultsPerPage : 5000);
                        if (sortBy != string.Empty)
                        {
                            dataSource.SortOrder.Clear();
                            dataSource.SortOrder.Add(sortBy, sd);
                        }

                 }
                catch (Exception ex)
                {
                     ULSLogging.LogError("MYLOGGING", "Search: " + ex.Message, ex.StackTrace); }
       
                }
            }

        }

Tuesday, February 18, 2014

Custom Actions for list items assigned programmatically


Custom actions are usually deployed in a declarative manner, such as an Elements.xml file. They can be deployed to a specific content type in case your document library inherits from the specific content type, such as below:

<?xml version="1.0" encoding="utf-8"?>
<Elements xmlns="http://schemas.microsoft.com/sharepoint/">
  </CustomAction>
  <CustomAction
  Id="{ACE9ADB4-A9CE-4503-9819-AC9C6FC09E01}"
  RegistrationType="ContentType"
  RegistrationId="0x01010059dee241fa9e47e8aded6c595cb2b406"
  Location="EditControlBlock"
  Sequence="101"
  Title="Approve/Reject Monthly Report">
    <UrlAction Url="javascript:MyNamespace.retrieveListItems({ItemId});"/>
  </CustomAction>
  
</Elements>
       
However, when your document library gets deployed via code, such as  feature receiver, and especially if the document library is not associated with a content type, there is the option to attach a custom action programmatically such as  in the example below.           


                    Guid formlibID = web.Lists.Add("My Library", string.Empty, SPListTemplateType.XMLForm);
                    SPList formLib = web.Lists[formlibID];

                    SPUserCustomAction printForm = formLib.UserCustomActions.Add();
                    printForm.Title = "Print Form";
                    printForm.Url = "javascript:MyNamespace.printForm({ItemId},'{ItemUrl}')";
                    printForm.Location = "EditControlBlock";
                    printForm.Update();

In both examples, the custom action performs some javascript logic (in this case the two functions both open up a modal popup), that takes in the current items' out-of-the-box ID and URL. 

Thursday, May 9, 2013

Double AD profiles in User Profile Service?

This is directly related to working with Claims.

The user profile service imports AD accounts and sets the 'identifier' of the object to be the sAMAAccountName (This is the AD property which looks like sampledomain\johndoe).

When a claims web app accesses the User Profile service, such as for example MySites, if configured to use Claims, it looks for the User Profile service by it's own identifier, which is the token in a format like this:  i:0#.f|ldapmember|johndoe

The object will not be found, and MySites will generate the user profile and set the url to the personal site (yet another property in User Profiles), and this is how you end up with two records that refer to the same person, such as below:


The first one is the one generated by the User Profile Service, with properties such as First name, Last Name and other properties you have mapped to be imported from AD, while the other profile is the one generated by MySites, and only has the token and the URL set to the personal site.

The solution is to map the two identifiers to each-other so that when a claims-based app queries the User Profile service, it finds the profile by token.


The first property, Claim User Identifier, refers to the token and the mapped AD property called sAMAAccountName refers to the format domain\user.

Once mapped, any user profile action will follow this rule. For already existing duplicate accounts, the duplicate token one needs to be deleted for clean-up.

The new MySite generations should look like this:


This solution assumes that when you set up the UPS AD connection, you configure it as well as Claims:


Saturday, May 4, 2013

Migrating CSV data into SharePoint lists

A common migration scenario of data into SharePoint involves CSV files to be imported via Datasheet view into SharePoint lists.

However there are some limitations such as multi-lookup values, where data should be provided in the following format: "5;#technology;#3science;#". The same format has to be provided for columns of type 'People or Groups', such as "67;#John Doe;#123;#Anne Jackson;#". As a result, you cannot use DataSheet view and you have to upload the CSV programmatically.

This post focuses on reading the CSV file programmatically. You have two options:
  • if you use Powershell, you can use the PS command import-csv and then access the data like this:

    import-csv c:\folder\file.csv
    foreach($line in $excelFile){$title = $line.name 

  • if you use C# you can read the CSV file via a OLEDB driver you need to install locally, to permit your 64-bit code (you have to run on 64 bit to be able to execute SharePoint API calls for the actual lookup of values and list item creation).

    You can find the driver here Microsoft Access Database Engine 2010 Redistributable.
    This driver is simply a replacement for JET OLEDB to be run on server applications. JET is only running on 32 bits.

    string connectionString = @"Provider=Microsoft.ACE.OLEDB.12.0;Data Source=c:\folder_name\;Extended Properties='text;HDR=Yes;FMT=Delimited'";

    string excelSheetName = "file.csv";

    OleDbConnection myConnection = new OleDbConnection(connectionString);
    myConnection.Open();
    OleDbCommand myCommand = new OleDbCommand("Select * from " + excelSheetName + ";", myConnection);
    OleDbDataAdapter adapter = new OleDbDataAdapter(myCommand);
    adapter.Fill(ds);

    myConnection.Close();


Sunday, January 13, 2013

How to use SharePoint's OOB error page to show a friendly error message

In many cases, such as a feature activation, it is best to not overwrite the out-of-the-box error page with a custom one, but have the page show a custom message such that users know where the custom code you wrote, failed.

Envision the following scenario: you have an OOB site collection and on custom feature activation, you try to:

  • bind custom fields deployed by the feature to a metadata term store
  • add these custom fields to content types
  • create subsites programmatically
  • set permissions programmatically, etc.
Wrap each action in it's own try-catch statement and inside the catch call your custom Error Handler  method that writes to the ULS logs.

In addition to writing to the ULS logs, have your method also do a forced Response.Redirect to the OOB error page, with "ErrorText" in the QueryString object:

  //write to log first, then:

   string idcurr = CorrelationId.GetCurrentCorrelationToken().ToString();
   errorMessage = HttpUtility.UrlEncode(errorMessage);
   HttpContext.Current.Response.Redirect("/_layouts/error.aspx?ErrorText="+ errorMessage + "&ErrorCorrelationId=" + idcurr);


The ErrorCorrelationId QueryString parameter will ensure that the ID you see on the error page matches what you see in the ULS logs.
But the actual Error Handling, if custom, will generate it's own ID when writing to the logs.
It is necessary for these two to match, basically for the code to associate the custom Error message generated with the ID shown on the page.
The only way to grab the latest CorrelationID generated is to grab it via this class, and I am referencing this blog where I found the solution to the issue:


public class CorrelationId
    {
        [DllImport("advapi32.dll")]
        public static extern uint EventActivityIdControl(uint controlCode, ref  Guid activityId);
        public const uint EVENT_ACTIVITY_CTRL_GET_ID = 1;
        public static Guid GetCurrentCorrelationToken()
        {
            Guid g = Guid.Empty;
            EventActivityIdControl(EVENT_ACTIVITY_CTRL_GET_ID, ref  g);
            return g;
        }
    }


Thursday, May 17, 2012

Authenticating on a web application with ACS


  1. Connect to ACS. You need to be made a co-Administrator to be able to create a new Access Service instance. Create a new one. Call it something relevant (namespace).  Once it is created, if you try to access it from the “Access Control Service” button in the ribbon, you might get a 403 error. The original Administrator of the Azure account needs to go in and under the new ACS instance, User Management, add you as an admin. Only then will you see the options.
  2. Create a new Relying party. Add the realm and return address to be the new Azure web app url (with https), leave the certify as default, let it create a new rule group. Leave all as defaults.
  3. The identity provider is Windows Live Identity Provider- this is already there out-of-the-box. You are good to go with that. This means you will log in with your Microsoft Live Id.
  4. Edit the rule group, make sure you add a new group for “nameidentifier”.
  5. Set up the web application for ACS:
  • You need Identity Foundation SDK 4 installed. Once installed, the FedUtil (old utility) will be part of Visual Studio. When clicking a web project, you will have a new option in the Tools menu called “Add STS reference”. Add the STS reference. Set the path to its own web.config(it will try to update as a result), set the URL to be the https url of the Azure web app url, add an existing STS by referencing its metadata file. You can get the metadata file from the ACS menu:
  • This adds a new section to the web.config file of the web application, called “Microsoft.IdentityModel”. This new section contains the url of the ACS (Access Control Service Instance you have to set up), the URL of the web application (https://servername), and other data.


Wednesday, May 16, 2012

Installing and setting up PowerPivot for SharePoint 2010


  1. 1. Log into the SharePoint 2010 central admin server as a farm administrator (whatever server Central Admin is installed on)
    2. Install PowerPivot from the SQL 2008 R2 Enterprise disk:
    THIS INSTALL REQUIRES AT LEAST ONE RESTART OF THE MACHINE
    THIS INSTALL REQUIRES ENTERPRISE

    2.1.  Click the Installation option on the left had side and then select New installation or add features to an existing installation
    2.2.  At the Setup Role screen select SQL Server PowerPivot for SharePoint and select your existing farm installation and click Next
    2.3.  Click Next on the Feature Selection screen (this is read only and for information only)
    2.4.  Setup will now run a rule check, if you get any errors you need to resolve these before you can continue – this should be bypassed now if logged in as farm admin and on the CA machine
    2.5.  Leave the name as is: “POWERPIVOT”
    2.6.  Select an account to run the Analysis Services and click Next. Type in the domain account you used as the app pool service account when you installed the DB engine of the instance that runs SharePoint. (say you have a sql instance that is the sql used by SP, go to configuration manager of that sql instance and look at the service account that was used for the DB engine)
    2.7.  On the summary screen click Install. Please check the summary screen first. It should display the correct Central Administration port. If not, you need to go to the installation configuration file (in the textbox at the bottom of the summary screen), open with Notepad and edit to the right port.
    2.8.  Before hitting install, please check this article. If you install on a CA server without a previous SQL installation, you should not run into errors, but check the 3 issues out of this article anyway before proceeding.
            Look at the red sections HACK #1, 2 and 3.
    THIS INSTALL REQUIRES A RESTART OF THE MACHINE

    3. Configure the farm for PowerPivot:
    3.1.  If the install has succeeded and it says so at the end of it, if you navigate to Central Administration, under ‘Manage Farm Features’, you should see :

    3.2.  Under System Settings, farm solutions you should see the following solutions automatically deployed:

    3.3.  Deploy the powerpivotwebapp.wsp to your web application.
    3.4.  System Settings | Manage Services on Server start the required services:
    ·         Excel Calculation Services 
    ·         Secure Store Service 
    ·         Claims to Windows token Service 

    3.5.  Under “Manage service applications”, create a new service application of type “SQL Server PowerPivot”, like in the screen below. Use all defaults.


    3.6.   Check to see if you have Excel Services enabled by seeing if it is listed in the Service Applications section of central admin. If not enabled, enable it by creating one. Use all defaults.
    3.7.   If there is no listing for a secure store then click on New and select Secure Store Service. Use defaults. Click on Generate New Key and complete the details (I this you should be all set on this one, we generated the key for other purposes in our last session)
    4.     Enable PowerPivot for the site
    4.1.  Site collection features->activate powerpivot:


    4.2.  This should deploy the new document library template:


    4.3.  When creating a PP library instance, you might get this:


    To resolve this, you need to add 
    <SafeControl Src=”~/_layouts/powerpivot/*” IncludeSubFolders=”True” Safe=”True” AllowRemoteDesigner=”True” SafeAgainstScript=”True” />” 
    to the site collection web config manually.


    5.     Additional  setup you need to perform:
    5.1.  Go to your site collection, try to export a list as a datafeed, and if you get this error:
    For security reasons DTD is prohibited in this XML document. To enable DTD processing set the ProhibitDtd property on XmlReaderSettings to false and pass the settings into XmlReader.Create method.
                                    It means you do not have ADO.NET for 3.5 (really just KB 982307) installed. You need to follow this article on MSDN (below) and install on the web server that has the web app that serves your site collection. If farm, on all web servers.

    THIS REQUIRES ANOTHER RESTART
    5.2.  Double-hop issue: you get prompted on data refresh of the powerpivot charts; you need to follow the steps from this article:


Classic mode to Claims mode migration


On an existing web application that is configured o run in Classic Mode authentication, if NTLM is the authentication provider, if you want to switch to Claims, you need to run the following script:


$WebAppName = "http://serverurl"
$account =
"domain\administrator"
$wa = get-SPWebApplication $WebAppName

Set-SPwebApplication $wa -AuthenticationProvider (New-SPAuthenticationProvider) -Zone Default

--wait here for the prompt to migrate users and answer YES

$wa = get-SPWebApplication $WebAppName
$account = (New-SPClaimsPrincipal -identity $account -identitytype 1).ToEncodedString()
$zp = $wa.ZonePolicies("Default")
$p = $zp.Add($account,"PSPolicy")
$fc=$wa.PolicyRoles.GetSpecialRole("FullControl")
$p.PolicyRoleBindings.Add($fc)
$wa.Update()
$wa = get-SPWebApplication $WebAppName
$wa.MigrateUsers($true)

In order to test if this has gone through:
  • check the web.config, if the new Membership Provider section for Claims has been added
  • log in as a site user, make sure that if you navigate to My Settings, you see the token format of the user, rather than domain\user
  • go to Central Administration and check that the Default Zone is set to Claims
  • in Central Administration, make sure in User Profiles that there are no duplicate accounts (the migration part of this script should take care of this)

Tuesday, November 1, 2011

How to show the SharePoint navigation tabs when in edit mode

A lot of times, the space allocated to header and logo is insufficient for a branded customized header. The regular out-of-the-box navigation tabs are not shown in edit mode, because the ribbon needs the space taken by both header and tabs in view mode.

To allocate more space for the header and logo image, many clients prefer to expand the header height by allocating the height used by the tabs, thus moving the tabs further below. When the users go into edit mode though, the Ribbon now only takes up once the height of the header and once the height of the tabs. It will move the page up when in edit mode. A solution is to always show the navigation regardless of mode.

In this case, view mode would show:

  • new header(height of old header + height of tabs)
  • tabs
Edit mode would show:
  • ribbon (height of old header + height of tabs by default)
  • tabs

What happens out-of-the-box: when in edit mode, the s4-titlerow  (which contains both Header area and Tabs) gets a "display:none;" and the Ribbon becomes visible.
Simply move the entire html structure from under s4-topheader2 from inside s4-titlerow right after s4-titlerow.

How to center a SharePoint master page

By default, SharePoint 2010 master pages expand to the current browser resolution.
In order to fix the width of the site pages and center them for bigger resolutions, several steps can be taken( below).
For the example below, let's consider 1280px to be the standard resolution. The site should cover the entire browser width when rendered in 1280px. Bigger resolutions such as 1600px should center the site in the middle of the browser and leave a gray margin left and right.


  • Find the div called s4-workspace. This is the entire page area and it gets expanded by SharePoint according to the current resolution. Add class="s4-nosetwidth". This will prevent the area from expanding to the browser's resolution.
  • Set the body to allow overflow. This will add the scrollbar on the browser window, not the workspace.    The workspace will take up only the center part of the page for bigger resolutions than 1280px, this means we don't want the scrollbar to appear on the centered part, but on the actual browser window.

          body.v4master{ overflow:visible !important; min-height:1200px; height:auto;}
          body #s4-workspace{   min-height:1200px; height:auto; overflow-y:hidden;}

  • Apply any generic text styles to s4-workspace and set the width of the workspace. The width is 1258 instead of 1280 to allow for a right vertical scrollbar and border on left and right.

          #s4-workspace
          {/* generic text styles for the entire site */
         font-family:Tahoma;
         font-size:12px;
        color:#434345;
        width:1258px;
           }

  • Under the body tag, create two new div-s <div id="main"><div id="centered">

          #main{overflow:visible !important;}
          #area{ background-color:#F6F6F6;}
          #centered{
             margin:0 auto;
           width:1260px;
           border-left:1px solid #B8BABD;
   border-right:1px solid #B8BABD;}

Wednesday, August 24, 2011

Enabling Forms-based authentication on a SharePoint 2010 site


The easiest out-of-the-box solution is to use the Asp.NET SQL Membership Provider as the repository for the forms-based accounts.
The ASP.NET SQL Membership Provider does not come with a UI for managing/creating users and accounts. A custom solution or a third-party tool is usually used for this approach, in this example I use the
Codeplex FBA Pack  you can download here http://sharepoint2010fba.codeplex.com/, because it offers:
  • a user creation web part
  • a password recovery web part
  • a password reset web part
  • code is available for customization
  • tools for admin management of users

Installation steps

1. Create the ASP.NET SQL Membership Provider

This membership provider comes with the .NET Framework 2.0 and up and can be installed by launching the following tool:
C:\Windows\Microsoft.NET\Framework\v2.0.50727\aspnet_regsql.exe

Leave all default settings in, type in the correct SQL Server name that will host this membership database and leave the database name to be “default”. This will create a new database called “aspnetdb” on your SQL Server.

2. Create a new forms-based web application that will host your new site collection

You can either create a single web application with both Windows and Forms-based authentication enabled on it, or the better approach is to create a web application with integrated Windows authentication enabled in the Default zone and then extend it onto another port, with Forms-based and anonymous in the Internet zone. This way, admins and a restricted number of internal users can access the   application with their Windows accounts, while the Internet zone can be accessed only via forms-based logins:


Navigate to Central Administration > Application Management > Manage Web Applications > New.
On the new “Create New Web Application” popup, pick “Claims Based Authentication”. Leave Windows/NTLM on and save.
Once your web application is created, click Extend in the Web Applications List Ribbon, while having the newly created web application selected. Chose a similar port and un-check NTLM and type in the new membership and role provider names:


You must enable anonymous access, because at least two of your new pages have to allow anonymous.
Let's call the two new pages "CreateMember.aspx" and "RecoverPassword.aspx". These two pages must be available without being logged in.
In case the out of-the-box login page is to be replaced with a custom one, a third page needs to be created that allows anonymous as well.

Create the site collection and set a Windows account as the site collection administrator. Once there are FBA accounts available, we can set the site collection administrator for the extended Internet zone application.

3. Bind the extended web application to the membership provider

Instructions can be found on a variety of blogs and also on msdn:

web.config settings need to be made in three locations: 
  • on the extended web application (1)
  • in Central Administration and (2)
  • in the Secure Token Service (3)
(1)  
  • Replace  <add key="AspNetSqlMembershipProvider" value="%" /> with  <add key="MyAspNetSqlMembershipProvider" value="%" /> - This setting will ensure that the People Picker control will allow admins the option of searching/adding a new user to SharePoint from the new membership provider.
  • Replace the membership provider/ role provider sections with:

    <roleManager enabled="true" cacheRolesInCookie="false" cookieName=".ASPXROLES" cookieTimeout="30" cookiePath="/" cookieRequireSSL="false" cookieSlidingExpiration="true" cookieProtection="All" defaultProvider="MyAspNetSqlRoleProvider" createPersistentCookie="false" maxCachedResults="25">
    <providers>
    <clear />
    <add connectionStringName="aspnetdb" applicationName="/" name="MyAspNetSqlRoleProvider" type="System.Web.Security.SqlRoleProvider, System.Web, Version=2.0.0.0, Culture=neutral, PublicKeyToken=b03f5f7f11d50a3a" />
    <add applicationName="/" name="AspNetWindowsTokenRoleProvidertype="System.Web.Security.WindowsTokenRoleProvider, System.Web, Version=2.0.0.0, Culture=neutral, PublicKeyToken=b03f5f7f11d50a3a" />
    <add name="c" type="Microsoft.SharePoint.Administration.Claims.SPClaimsAuthRoleProvider, Microsoft.SharePoint, Version=14.0.0.0, Culture=neutral, PublicKeyToken=71e9bce111e9429c" />
    </providers>
    </roleManager>
    <membership defaultProvider="i" userIsOnlineTimeWindow="15" hashAlgorithmType="">
    <providers>
    <clear />
    <add connectionStringName="aspnetdb" enablePasswordRetrieval="false" enablePasswordReset="true"  passwordAttemptWindow="10" applicationName="/" requiresUniqueEmail="true" passwordFormat="Hashed" name="MyAspNetSqlMembershipProvider" type="System.Web.Security.SqlMembershipProvider, System.Web, Version=2.0.0.0, Culture=neutral, PublicKeyToken=b03f5f7f11d50a3a" />
    <add name="i" type="Microsoft.SharePoint.Administration.Claims.SPClaimsAuthMembershipProvider, Microsoft.SharePoint, Version=14.0.0.0, Culture=neutral, PublicKeyToken=71e9bce111e9429c" />
    </providers>
    </membership>
  • Add the following connection string after <configSections>
  • <connectionStrings> <add name="aspnetdb" connectionString="data source=MOSS2010;Initial Catalog=aspnetdb;Integrated Security=SSPI;" providerName="System.Data.SqlClient" /></connectionStrings>
(2)

  • Add the following connection string after <configSections>
  • <connectionStrings> <add name="aspnetdb" connectionString="data source=MOSS2010;Initial Catalog=aspnetdb;Integrated Security=SSPI;" providerName="System.Data.SqlClient" /></connectionStrings>
  • <roleManager enabled="true" cacheRolesInCookie="false" cookieName=".ASPXROLES" cookieTimeout="30" cookiePath="/" cookieRequireSSL="false" cookieSlidingExpiration="true" cookieProtection="All" defaultProvider="AspNetWindowsTokenRoleProvider" createPersistentCookie="false" maxCachedResults="25">
    <providers>
    <clear />
    <add connectionStringName="aspnetdb" applicationName="/" name="MyAspNetSqlRoleProvider" type="System.Web.Security.SqlRoleProvider, System.Web, Version=2.0.0.0, Culture=neutral, PublicKeyToken=b03f5f7f11d50a3a" />
    <add applicationName="/" name="AspNetWindowsTokenRoleProvider" type="System.Web.Security.WindowsTokenRoleProvider, System.Web, Version=2.0.0.0, Culture=neutral, PublicKeyToken=b03f5f7f11d50a3a" />
    </providers>
    </roleManager>
    <membership defaultProvider="MyAspNetSqlMembershipProvider" userIsOnlineTimeWindow="15" hashAlgorithmType=""><providers>
    <clear />
    <add connectionStringName="aspnetdb" enablePasswordRetrieval="false" enablePasswordReset="true" requiresQuestionAndAnswer="true" passwordAttemptWindow="10" applicationName="/" requiresUniqueEmail="false" passwordFormat="Hashed" name="MyAspNetSqlMembershipProvider" type="System.Web.Security.SqlMembershipProvider, System.Web, Version=2.0.0.0, Culture=neutral, PublicKeyToken=b03f5f7f11d50a3a" />
    </providers>
    </membership>
(3)

  • Add the following connection string after <configSections>
  • <connectionStrings> <add name="aspnetdb" connectionString="data source=MOSS2010;Initial Catalog=aspnetdb;Integrated Security=SSPI;" providerName="System.Data.SqlClient" /></connectionStrings>
  • Add the section below:
    <system.web>
    <membership>
    <providers>
    <add connectionStringName="aspnetdb" enablePasswordRetrieval="false" enablePasswordReset="true" requiresQuestionAndAnswer="true" passwordAttemptWindow="10" applicationName="/" requiresUniqueEmail="false" passwordFormat="Hashed" name="MyAspNetSqlMembershipProvider" type="System.Web.Security.SqlMembershipProvider, System.Web, Version=2.0.0.0, Culture=neutral, PublicKeyToken=b03f5f7f11d50a3a" />
    </providers>
    </membership>
    <roleManager enabled="true">
    <providers>
    <add connectionStringName="aspnetdb" applicationName="/" name="MyAspNetSqlRoleProvider" type="System.Web.Security.SqlRoleProvider, System.Web, Version=2.0.0.0, Culture=neutral, PublicKeyToken=b03f5f7f11d50a3a" />
    </providers>
    </roleManager>
You should now be able to navigate to your new site collection and you should be prompted for credentials -
"/_forms/default.aspx" is the out-of-the-box login for forms-authenticated users.
In order to log in here, at least one forms account needs to be created in the database (aspnetdb) and added to SharePoint as a user. You will do this from the new CreateMember.aspx page, once it is set up.

4. Install the Codeplex FBA app


Pre-requisites for installing the FBA Pack:
o   site collection features: "Publishing Infrastructure" should be activated
o   site features: “SharePoint Server Publishing” features should be activated
Follow the installation instructions on Codeplex.

Create a new document library called 'Public' with two pages  "CreateMember.aspx" and "RecoverPassword.aspx", each with the corresponding FBA Pack webpart on it. Enable anonymous access on lists and document libraries only and enable it on the 'Public' library only. Make sure both pages have at least one published major version. You should be able to navigate to these pages without being signed in.
Use the CreateMember.aspx page to create the first generic admin FBA account. Log in as Windows site collection administrator and make this new FBA account site collection admin on the extended web application.
Saturday, June 18, 2011

How to set up database mirroring on a SharePoint live system

Scenario:
            Let's take a SharePoint 2010 farm installation with two front-ends WFE01 and WFE02 and two SQL Server 2008 R2 instances called SQLDB01 and SQLDB02.
            Let's install a third SQL Server instance (which can be SQL Express) to serve as the Witness in this mirroring scenario. We will use the SQLDB02 hard drive and the instance will be called SQLDB02\Witness.
            When installing the SharePoint farm, point both web front end instances to the same SQL Server SQLDB01. We will keep SQLDB02 separate from the farm, with SQLDB01 mirrored into SQLDB02 for fail-over in case of disaster.

The instructions below are supporting a high-availability synchronous mirroring configuration. This means that a SQL Server serving as a witness needs to be present, to ensure automatic fail-over. Otherwise, some manual configuration is needed in case of disaster. The table below describes all types of mirroring:

Two main actions need to be taken to enable mirroring:
  • Configure mirroring in SharePoint Central Administration  at Web Application level - by using the UI
  • Configure SQL Mirroring on the SQL Server instances - by running several sql scripts

In detail:
  1. Configure mirroring in SharePoint for the web application on port 80 with database WSS_Content


  2. Run step by step:
  • Run on SQLDB01 for each database you want mirrored. Only mirrored databases will be available in case of disaster. This script will set full recovery on the main WSS_Contect database to be mirrored. Full recovery needs to be set, in order to take a transactional log backup, which is necessary for mirroring.
alter database WSS_Content set recovery full
go
  • Take full backups of all SharePoint databases and place the backups into the folder “U:\Backups\”.
backup database WSS_Content to disk = 'U:\Backups\WSS_Content.bak' 
go
  • Take transactional log backups and save them with “*_log.bak” into the folder “U:\Backups\”.
BACKUP LOG WSS_Content to disk = 'U:\Backups\WSS_Content_log.bak'
go
  • Restore all databases on SQLDB02 in “NORECOVERY” mode.
restore database WSS_Content from disk = 'T:\restores\WSS_Content.bak' with norecovery, 
move 'WSS_Content' TO 'T:\DATA\WSS_Content.mdf',
move 'WSS_Content_log' TO 'U:\LOGS\WSS_Content_log.ldf' 
go
  • Restore all transactional logs on SQLDB02 in “NORECOVERY” mode:
restore log WSS_Content from disk = 'T:\restores\WSS_Content_log.bak' with norecovery
go
  • Enable mirroring by following the instructions:
--enable mirroring on SQLDB01 - principal, SQLDB02- mirror and SQLDB02\Witness as witness
--run this on SQLDB01 and on SQLDB02
CREATE ENDPOINT Mirroring
     STATE=STARTED
     AS TCP(LISTENER_PORT=5022)
     FOR DATABASE_MIRRORING(
     AUTHENTICATION=WINDOWS NEGOTIATE,
     ENCRYPTION=SUPPORTED,
     ROLE=PARTNER)
     GO 
--run on SQLDB02\Witness - note different port because it has the same ip as the mirror
CREATE ENDPOINT Mirroring
     STATE=STARTED
     AS TCP(LISTENER_PORT=5023)
     FOR DATABASE_MIRRORING(
     AUTHENTICATION=WINDOWS NEGOTIATE,
     ENCRYPTION=SUPPORTED,
     ROLE=WITNESS)
     GO
--run this on the mirrored instance SQLDB02
ALTER DATABASE WSS_Content
SET PARTNER= N'TCP://SQLDB01:5022'
GO
--run this on SQLDB01
ALTER DATABASE WSS_Content
SET PARTNER= N'TCP://SQLDB02:5022'
GO
--run this on SQLDB01 to assign the witness
ALTER DATABASE WSS_Content
SET WITNESS= N'TCP://SQLDB02:5023'
GO
  • Test that mirroring is working by checking if each database is marked with “Principal” or “Mirror”.
  • Test that mirroring is working by stopping the SQL Server service on SQLDB01 and testing that the site on port 80 is still working. When SQLDB01 is down, the SQLDB02 databases should not show “Mirror” anymore. 
  • If you restart the service on SQLDB02 and stop it on SQLDB01, SQLDB01 will once again become the principal. If you restart SQLDB02 now, this will become the mirror. The witness makes sure the only server standing is always the principal to ensure latest data integrity.